Do You Plant Potatoes Sprouts Up will be the topic of our conversation on this particular occasion. There is, without a doubt, a great deal of information pertaining to How To Plant Sprouted Potatoes In Containers available on the internet. As a result of the rapid development of social media, it is now much simpler for us to acquire new information.
There is a connection between the pieces of information pertaining to How Deep Do You Plant Potatoes, How Deep Do You Plant Potatoes, and Frequently Asked Questions About Growing Potatoes. Regarding the other items that need to be searched, one of those things is concerning How To Plant Sprouted Potatoes In Containers, which will also have something to do with When To Plant Sprouted Potatoes.
94 Interesting Facts Do You Plant Potatoes Sprouts Up | How Far Apart to Plant Potatoes in Your Garden
- In the Southeast, soils get too hot in the summer to grow great potatoes. Varieties with DTM beyond 120 days is not advisable. Shoot to have all your taters up by the end of July at the latest for best quality. - Source: Internet
- Small potatoes can be planted whole, but larger potatoes (bigger than a golf ball) should be quartered with a clean knife ($95, Williams Sonoma) before planting. Make sure each piece includes an eye or bud. To prevent rot, let the pieces dry for a couple of days before planting. Plant the seed potatoes a few inches deep in loose, well-drained soil and spaced 12-15 inches in rows. - Source: Internet
- Chitting potatoes is also called greensprouting, or pre-sprouting. Chitting it is a way of preparing potatoes for planting by encouraging them to sprout before planting in the ground. This gives the tubers a head start and encourages faster growth and heavier crops once the seed potatoes are planted. - Source: Internet
- Seed potatoes have been grown to physical maturity meaning they were cured in the ground before harvest and are able to be stored successfully to produce next year’s crop. You’ll notice that most seed potatoes come from northern latitudes like Colorado, Idaho and Maine. These climates have the kind of weather potatoes need to produce high quality, disease-free seed crops. - Source: Internet
- Keep in mind that potatoes grown in the Southeast will likely be harvested before the scorching heat of summer and will not get a chance to cure in the ground. This means skins will be very fragile and the potatoes will not keep as long as those that are allowed to fully mature and cure in the ground. You can expect Southeastern crops to store 1-3 months, depending on variety, potato size and storage conditions. Past 3 months, potatoes may start to dehydrate and deteriorate in quality. - Source: Internet
- We all know that potatoes prefer to be underground. These tubers are technically enlarged or thickened portions of the plant’s rhizomes. The plant uses these swollen stems as a source of nutrient reserves deep in the soil. - Source: Internet
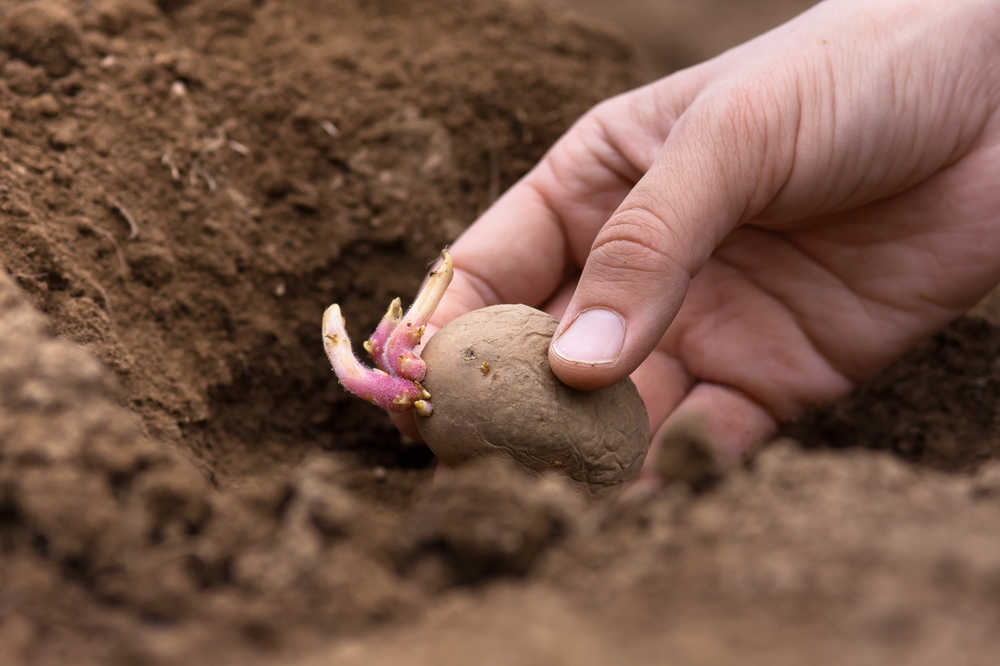
- Examine each potato and identify the end with the most eyes. This is called the rose end and this is where your potatoes will grow sprouts. Place your seed potatoes a single layer in egg cartons or shallow, open boxes with the rose end up. - Source: Internet
- Harvesting your potatoes is easy. If they’re in a plot of soil in the garden, gently turn the soil with a spade or potato fork and pick up the potatoes you find. Brush off the dirt on each potato, then allow them to cure for another week or two in a cool, dry place. In containers, many potato bags have “windows” to access the tubers. If you’re harvesting new potatoes, they don’t need to be cured. - Source: Internet
- Here’s my three rows of potatoes in their trenches, after filling in with soil. You can see how there’s a mound of soill over each of the seed potatoes. In the first row, I’ve planted them about 10-12 inches apart. In the subsequent rows, I’ve put the seed potatoes a bit closer together. - Source: Internet
- Potatoes prefer soil that has been amended in the Fall with your amendment(s) of choice &/or compost. Some growers will cover crop spring potato beds with Canola/Rape, oats or barley_ something that will hold the soil over the winter but be easy to kill and incorporate before planting their potatoes. Other growers prefer to leave spring potato beds fallow and weed-free for ease of getting into the field as early as possible. Whatever bed preparation method you choose, potatoes DO NOT like to be next to actively decomposing green matter. Leave time between tillage and planting to allow green matter to break down; 2-6 weeks is a good time frame. - Source: Internet
- There’s a very important reason we keep potatoes in the dark. If potatoes are exposed to sunlight, they will start to photosynthesize and produce a green pigment under the skin. This ‘greening’ IS TOXIC to anything that eats it!! It’s a great strategy for the potato to avoid being eaten but not so great for us if we plan on harvesting an edible crop. Hilling potatoes ensures that forming tubers are fully covered with soil and are protected from the sun’s rays. With that in mind, if you see any potatoes at the soil line, be sure to cover them promptly to prevent greening. - Source: Internet
- The sprouts that happen to peek above the soil will green up and become vines with time. If your eye sprouts are particularly tall, you can go a bit deeper than 3–4 inches of covering. Sometimes I do, if my seed potatoes have gone crazy that year. - Source: Internet
- You can always dig around a bit to see how things are coming along. Generally, new potatoes will be present by day 60; they will be small and fragile. You can take a few if you just can’t wait any longer!! Most varieties will have good-sized tubers that are ready to harvest by 90 days. - Source: Internet
- The adults are smaller than a golf ball, and they lay their eggs on the plants. Their larvae overwinter under the soil. Put crop rotation into place so potatoes aren’t planted in the same location every year. - Source: Internet
- The closer together you plant your potatoes, the smaller the tubers will be. I like a mix of potato sizes, because I use them for a variety of dishes. Smaller potatoes are better for hash-type dishes—where they’re sauteed with veggies and topped with an egg—because they’re more tender and take less time to cook through. - Source: Internet
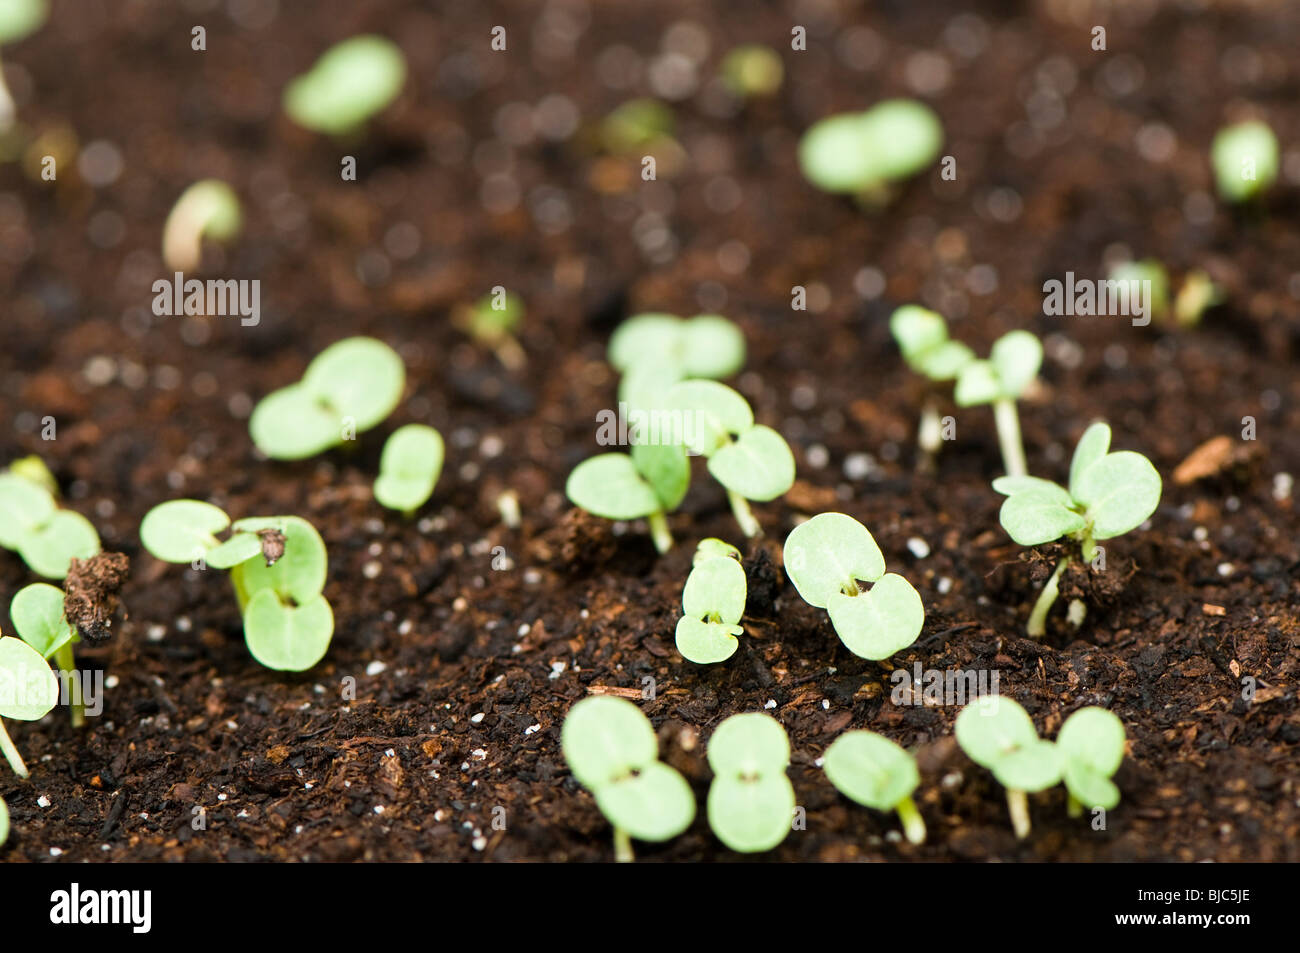
- Few crops are as rewarding to grow as potatoes. From watching their little eyes open and emerge from the soil after planting to peaking around the base of the plants to see the first tubers forming to finally harvesting a bountiful crop of fresh potatoes…no matter if it’s your first or 50th crop the whole process is magical. Got questions? We’ve got answers…. - Source: Internet
- If you live in an area where there are soil born viral or bacterial diseases that affect plants in the Solanaceae family (Potatoes, Tomatoes, Peppers & Egg Plants). Then you might want to reconsider cutting your seed potatoes. Many garden experts recommend against cutting seed potatoes if you have these types of diseases in your garden. The idea is by cutting your seed potatoes you open them up to more vulnerability to soil born problems. - Source: Internet
- Gently loosen the soil around the entire potato plant in early fall and remove the roots from the soil. The way to know when potatoes are bad is by feel and smell. Spoiled potatoes are wrinkly, slimy, and stink. Make sure to wash the potatoes before cooking with them. - Source: Internet
- Dig a trench in your bed about 4”-6” deep; triangle or standard hoes work well. Lay seed pieces eyes-up in the trench at 8”-12” for standard potato varieties and 12”-16” for fingerling varieties. You may wish to lay drip tape into the trench next to your seed potatoes to conserve water and to ensure that any water you put out gets to your crop and not your weeds. Cover seed (and drip tape, if used) with several inches of soil and tamp lightly….and you’re done! - Source: Internet
- If your potatoes don’t have sprouts, you can help them appear by a process known as chitting. Chitting is a process that encourages potatoes to sprout, and it is a good idea to start it a few weeks before you plan to plant the potatoes. Place the seed potatoes with visible eyes facing upwards in a shallow box or egg carton, making sure to keep the lid open. Set the box or carton in a dark room that stays at about 70-degrees Fahrenheit. After about a week, the eyes will start sprouting. - Source: Internet
- With the exception of plant breeders, we propagate potatoes vegetatively or asexually; potatoes of the same variety are genetically identical to their parents. So, the ‘seed’ that you’ll find to grow potatoes looks like, well, a potato. However, there are some significant differences that separate seed potatoes from the ones you find in the grocery store. - Source: Internet
- Common Mistake: When you’re new to potato growing, it’s easy to just harvest the spuds and forget about curing them. Many gardeners pull the potato plants, wash off the tubers, and pile them in totes expecting that they will last all winter long. This can lead to rotting just a few weeks after harvest, which means no potatoes for scrumptious holiday meals or cozy winter soups. - Source: Internet
- Store all potatoes in a cool dark place until you are ready to eat them or sell them. A light-free storage place is critical to keep potatoes from ‘greening’. DO NOT EAT green potatoes; they contain a toxin that is detrimental to the central nervous system. Any green potatoes should be discarded. No green? No problem. - Source: Internet
- Common Mistake: When cutting seed potatoes into smaller chunks, beginners sometimes forget to leave enough buds on each block of seed potato. When these seed potato chunks are planted, they don’t sprout and end up rotting in the ground. Another common mistake is accidentally bumping, damaging, or removing potato sprouts before planting. - Source: Internet
- If left alone, the eyes will start to sprout and continue to grow longer and longer. While the growth of a sprout on a potato doesn’t alter the taste of the potato, growing sprouts will cause the potato to dry out, making the potato flesh rubbery and the skin wrinkly. It is perfectly ok to remove a couple of short buds growing on a potato but when the potato becomes a mass of buds it will most likely be very rubbery and is past saving and should be thrown out. - Source: Internet
- Planting potatoes with the eyes facing upward is the best course of action. That doesn’t mean, however, that you’re in trouble if you plant them with their eyes facing down. Most seed potatoes grown by farmers are planted into the soil by a potato planting machine which places the seed potato at a pre-determined depth – it cannot plant the seed potato in the soil with the longest buds/ sprout uppermost. - Source: Internet
- The way to grow potatoes from scraps starts when you either use old potatoes at home or you purchase some potatoes from garden centers or a grocery store. Observe each potato until you find the one with the most eyes. Now it is time to learn how to get potatoes to sprout eyes. - Source: Internet
- The key to planting potatoes is choosing the right soil. Soil shouldn’t be heavy or wet because the potatoes may rot, but it also shouldn’t be too dry because that will slow growth. Choose a location with moist, but not soggy soil—or use a potato growing box (there are many tutorials on how to build them online, see below) so that you can better control moisture throughout the growing season. - Source: Internet
- Potato plants grow best in loose soil that is free from rocks and debris. Before planting, you may also want to add soil amendments, such as compost rich in organic matter, to help improve the quality of the soil. One part compost and 2 parts garden soil is generally a good ratio for potato soil. Growing potatoes in rocky or compacted soil, usually means the plants won’t have enough soil, air, water, or nutrients to grow properly and you will experience low yields. - Source: Internet
- Common Mistake: Packing more seed potatoes into a smaller area will not necessarily increase yields. In fact, it can often result in smaller plants, smaller potatoes, and less overall vitality in the planting. Just like humans crammed into a subway, potatoes really don’t enjoy being overcrowded. - Source: Internet
- If you want to eat your potatoes fresh, only dig up what you want for immediate eating. If you plan on storing your potatoes, don’t dig them up until 2 or 3 weeks after the foliage dies back. Dig potatoes up with a spading fork ($45, The Home Depot), being careful not to pierce the tubers. Leave the potatoes on the ground for a few hours to dry and cure. Brush off loose soil and store in a cool dry place until you’re ready to use them. - Source: Internet
- First, most potatoes in the grocery store have been treated with a sprout-inhibitor that prevents the potatoes’ eyes from developing while in storage and on the shelf. Seed potatoes are NEVER treated with sprout inhibitors. This alone can be the difference between growing potatoes successfully or not. - Source: Internet
- Timing is important—both for the potatoes themselves and the soil temperature. If you wait too long before planting the seed potatoes, you may have trouble getting them to grow. How long is too long? Seed potatoes will grow well if the sprouts growing from the eyes are no more than 1/2-inch long. In other words, if there are no sprouts or short sprouts, then you are good to go. To prevent your seed potatoes from sprouting, keep them in a cool, dry and dark place away from other fruits and vegetables. - Source: Internet
- It’s best to grow potatoes from specially grown seed potatoes from a garden supply store that is certified disease-free. The potatoes you buy in the grocery store may have been treated with a sprout inhibitor to prevent them from sprouting in your pantry. However, if you have some potatoes that are beginning to sprout (the “eyes” have swollen, whitish shoots beginning to develop), simply plant a piece of the sprouting potato in the ground or in a roomy pot ($3, Lowe’s) covered with 3 inches of soil. Within 2 weeks, green shoots should emerge. These will grow into bushy plants, and after 3 months or so, new spuds will develop below ground. - Source: Internet
- In the southeast, we typically plant our potatoes in March. Consider waking up your potatoes in mid-February by green-sprouting them for several weeks before planting. Place whole seed potatoes one or two layers deep in a box then leave them in a warm_60-85 degrees_ dark place to encourage their eyes to pop. Be careful when handling them to avoid breaking off sprouted eyes. - Source: Internet
- On the other hand, too much water can cause premature rotting in the ground. I’ve seen potatoes literally disintegrate into mush when they are grown in waterlogged, swampy soil. Those tubers are definitely not appetizing! - Source: Internet
- Different varieties of potatoes have different Days To Maturity (DTM). It’s best to identify the variety you are growing and its DTM to give you an idea of when your crop will be ready to harvest. Count the days from planting to figure out target harvest dates per potato variety. - Source: Internet
- Water in your seed potatoes, then immediately mulch with straw. This will keep the soil moist and cool underneath, which is just what they need to root. Then, just like about everything else in your garden, potatoes need about an inch of water per week. - Source: Internet
- So when you have a larger seed potato like this one in the photo above, it may have 15 or more sprouts. It is possible to cut this seed potato into 2 or even 3 pieces, dividing the sprouts between each chunk. Each of the pieces will then sprout, grow and become its own potato plant. - Source: Internet
- Finally, you’ll need to keep an eye out for pests and diseases. To avoid bacterial or fungal disease, it is best to plant your potatoes in a new spot each year. The potato beetle is a common pest, but you can prevent an infestation by inspecting the undersides of potato leaves for eggs. If you spot a yellow to orange cluster of eggs, remove the affected leaves. - Source: Internet
- Spacing for potatoes is around 12 inches apart. Potato soil depth is important, too. They must be covered with a minimum of three inches of potting soil to survive. - Source: Internet
- Just like winter squash, potatoes need to be cured in order to thicken their skins and strengthen their flavors. Curing is the process of preparing potatoes for storage. It can be done in the garden or in a dark, warm area like a root cellar or pantry. - Source: Internet
- Second, any seed potatoes you buy should be CERTIFIED DISEASE FREE. Potatoes intended to be sold for seed are tested for a panel of diseases before receiving a government-issued ‘disease-free’ certificate. Any seed lots that test positive are not certified and are not sold. Without this assurance, you could unknowingly introduce diseases into your crop and your soil that could persist for many years. So, if you like growing potatoes, don’t risk planting seed from questionable sources because there’s no way of knowing what else you’ll be planting. - Source: Internet
- Common Mistake: Beginner gardeners often think you can just plant potatoes and forget about them. They may not know to “scout” their plants for pests before things get out of hand. This is the most important preventative measure for keeping potato plants safe from pests. - Source: Internet
- This is why you never see green-skin potatoes sold in stores. It is also why potatoes are not eaten raw. Potatoes are vegetables that grow best in the shade, and should be stored that way too! - Source: Internet
- Set them out on parchment paper or a paper grocery bag, spaced well apart. Let them sit until planting day. By allowing the cut edges to dry, you cut down on the risk of rot, as freshly cut seed potatoes can absorb too much moisture when they’re planted. - Source: Internet
- In the southeast, potatoes are grown from March to May-July, depending on varietal days to maturity. Y’all know what else is growing March to July….WEEDS!! Oh, the weeds… You’ll have to manage those any way, you might as well go on and hill those taters in the process. Hilling uproots weeds as you pull the soil up around the potato plants. - Source: Internet
- “New” potatoes are young, tender spuds harvested in mid to late summer. These potatoes are smaller in size and have thin skins that are decadent when roasted or pan-fried, but very susceptible to damage. New potatoes are usually harvested for eating within a week or two, and they don’t cure or store very well. - Source: Internet
- At first thought, potatoes don’t seem like a very exciting crop to grow in your garden. These tubers are often thought of as bland, nutritionless roots that need loads of butter to taste good. But this couldn’t be farther from the truth: The humble potato is simple to grow, surprisingly flavorful, and provides abundant yields of nourishing roots that you can store all winter long. - Source: Internet
- Potatoes are susceptible to a range of destructive pests, from Colorado potato beetles (CPB) to aphids to leafhoppers. CPB in particular causes more crop damage to potatoes than any other insect. These orange and black striped or spotted beetles can wipe out a crop in just a few nights if they get out of hand. - Source: Internet
- If you purchase large seed potatoes, then you’ll need to cut them down to about the same size as a small seed potato. Cut them in half, or if the potatoes are really large, cut them into quarters. Make sure that each chunk of potato has at least one eye, which is a small depression in the surface of the potato where the roots sprout. If you need to cut seed potatoes, it is best to wait at least four to seven days before planting them. Let the cut surfaces “heal” in a cool, dry place to reduce the risk of your seed potatoes rotting. - Source: Internet
- Potatoes need water, but they don’t need to be sitting in a puddle. Depending on the weather and your soil type, we can provide the potato plants with better drainage by periodically pulling up soil around the growing stems. Heavy rains will run off into the aisles and away from the potatoes. - Source: Internet
- It is of no real consequence if you plant your potatoes with the eyes/sprouts facing up or down, as all the sprouts will eventually reach the surface and form the potato plant above the surface of the soil. However, if you are planting your seed potatoes by hand and have the opportunity to place each seed potato with the longest buds facing upwards then why not take advantage of the natural headstart nature has provided you with? Planting a potato with the longest sprouts upward will reach the surface of the soil sooner and establish your potato plant quicker. Happy planting! - Source: Internet
- How to Avoid It: Check that every seed potato, or seed potato chunk, has at least 2-3 eyes per plant. Eyes that have already sprouted (whether through “chitting” or being exposed to light in your kitchen) should be handled carefully so the sprouts aren’t disturbed. When planting the seed potatoes in the spring, be sure that the eyes or sprouts are facing upwards so they can grow stems and leaves up toward the sunlight. - Source: Internet
- Seed potatoes are technically clones of a mother potato plant. When planted, they grow into new potato plants that produce an abundance of tubers. However, if your seed potatoes don’t have “eyes” or growing points, there is no way for them to sprout new leaves and stems. - Source: Internet
- In an ideal world, potatoes would prefer 1-2” of water per week through rainfall or irrigation. The soil should remain consistently moist and never completely dry out. Fluctuations in soil moisture can be problematic for yields as well as potato quality. - Source: Internet
- After you see leaves starting to form fully, feed it with a fertilizer with a higher ratio of potassium and phosphorus than nitrogen. Potatoes themselves are high in potassium, so they need plenty of it to grow big. The phosphorus helps the plant produce a larger number of potatoes. - Source: Internet
- To cut your seed potatoes simply use a sharp knife, select a line that will give each piece at least 4 eyes and cut off a big chunk! Be careful to not cut through any of the eyes as this will destroy the future sprout. It’s that simple, suddenly 1 seed potato becomes 2 or 3 allowing for more potato plants from less seed. After cutting seed potato I like to have a piece that is at least 2 or 3 inches long and wide. - Source: Internet
- You can plant potatoes in the ground or containers. In this story, I’ll share with you my tips on planting seed potatoes in the ground. If you’re interested in planting potatoes in containers, skip to the end of my article! - Source: Internet
- As the weather starts to warm a bit in the spring it’s time to plant your seed potatoes. No matter what garden zone you live in, you usually start planting potatoes without any frost protection about 2 weeks before your last frost date. (To learn what garden zone you live in check out this post) - Source: Internet
- The potatoes we grow in the Southeast are considered ‘new’ potatoes, regardless of size, because they’re being harvested off plants that are still alive. These ‘new’ potatoes have very fragile skins, are easily damaged and will not cure in the ground due to the heat of summer soils. Lucky for us, we’re just in it for the goods and can still enjoy quality potatoes for food if not for seed. - Source: Internet
- Planting seed potatoes is strange. They’re not seeds, and they’re not seedlings. They’re basically chunks of potato with bizarre tentacles sprouting out of them. It makes learning how to plant potatoes a little challenging. - Source: Internet
- If your seed potatoes are large, you can divide them into smaller pieces. Cutting your seed potatoes is a thrifty way of increasing your seed stock and potential yield. Each piece will grow a potato plant that will produce numerous tubers. - Source: Internet
- Pulling potatoes too early often means a disappointing harvest of small, undeveloped tubers. But harvesting too late can mean frost-damaged or rotten tubers that won’t store. Finding the perfect harvest window takes a little bit of attention and inspection. - Source: Internet
- You name it, a potato can do it: Mashed, fried, baked, boiled, hashed, and more. So it should come as no surprise that it’s just as easy to skip the produce section and start growing potatoes in your own yard. All you need is a sunny space to grow them, a steady supply of water, and seed potatoes (the sprouted portion of a potato that you plant in the ground). So, yes, it’s true: you can grow potatoes from potatoes! Take your pick from russet, Yukon, fingerling, and more varieties, and get your potato patch started so you can enjoy all their starchy goodness fresh from your garden. - Source: Internet
- Common Mistake: Forgetting to weed potatoes before they are established can lead to overgrown weeds that shade out or out-compete young potato plants. Inexperienced gardeners may accidentally rip out potato plants by pulling larger weeds without holding the potato plant roots in place. Hoeing too close to the plants can also damage the tubers or stems. - Source: Internet
- Separating the tubers from the potatoes is the first step in growing potatoes from eyes. Cut your potato tuber from the whole potato. Find an area in your garden bed that receives full sun and has plenty of drainage. - Source: Internet
- Potatoes love the sun, so plant your potato patch in a spot with full sun (where the plants will get at least six hours of sunlight each day) for the best results. Potatoes are planted with pieces of tubers called seed potatoes. Plant seed potatoes in spring around the time of the last expected frost. - Source: Internet
- If you like “new potatoes,” then you can start harvesting within two to three months of planting, although most gardeners will only harvest a small portion of their crop while allowing the rest of the potatoes to keep growing. To harvest larger potatoes, find out what the recommended growing time is for the variety you chose—usually between 70 and 100 days. When the time is right, cut the potato plants back to the ground, water them one last time, and then wait two weeks to let the potatoes age and the skins toughen up — in the ground. - Source: Internet
- Plan on planting your potatoes in early spring about two to four weeks before your last expected frost date. Look yours up by zip code at Plantmaps.com. - Source: Internet
- Place potatoes on a greased baking sheet using your favorite healthy fat (Matt and Betsy use tallow, lard, coconut oil, or olive oil). Put your egg white mixture in a spray bottle and spray the fries. Bake at 350º until the outsides are crispy, but insides are tender. (Baking time depends on the size of your cut so just test them.) - Source: Internet
- Cover the seed potatoes with 3–4 inches of soil, or about 3-4 trowels full of dirt. Yes, this means you’ll likely be covering your sprouted vines—resist the temptation to cover them with less soil in order to leave the sprouts uncovered. They need lots of cover to encouraging rooting. And the sprouts will keep growing upward, eventually breaking through the soil. - Source: Internet
- It is of no major consequence if the seed potatoes are planted with the longest sprouts/eyes facing downwards. This is because eyes and sprouts will generally appear on all sides of the potato sooner or later and will all reach the surface of the soil eventually. The time for a potato to reach the surface of the soil if it had been planted with its longest buds facing downward compared to upwards is only an extra few days to a week maximum. - Source: Internet
- Yes, the potato does not need to have buds showing on the seed potato before planting. You can plant potatoes before buds have appeared, although it’s better to wait until the buds have started sprouting before planting as it gives the plant a headstart. This can lead to the plant establishing above ground earlier, as well as a potential for higher yields from a slightly longer growing season. - Source: Internet
- If you sprout your own seed potatoes, like I do, you’ll want to pull them out of the dark storage location you’ve been keeping them in, and survey the situation. Do this about three days before you plan to plant. I usually plant my potatoes around St. Patrick’s Day, but you can plant them out as soon as the dirt isn’t a frozen, muddy mess, and you can plant them into April. So if it’s the end of March, it’s not too late! - Source: Internet
- Select egg sized segments with at least three sprouts per piece and cut the potatoes with a sharp knife. Let the cut areas heal over for a few days before planting. They should feel leathery and dry to the touch. You can also dip the freshly cut ends in in wood ash. - Source: Internet
- Once you decide what potatoes to grow, you are ready to start chitting. Chitting is when you pre-sprout your spuds to get a head start on the growing process. If you’re growing potato plants from eyes, you’re already practicing chitting. - Source: Internet
- Planting potatoes is not a difficult task, but there are many tips you learn over the years to grow these versatile vegetables optimally. If you are planting your seed potatoes by hand and placing them into the drill/bed/row you should plant them with the eyes facing upwards. By placing your potatoes with the buds/eyes facing upwards the potato plant stems will reach the surface sooner. This will mean your potato plant will establish its leaves faster and be ready for harvesting earlier in hopefully better weather. - Source: Internet
- Place small potatoes in a single layer in egg cartons or boxes. Place the seeds in a warm and dark place that remains around 70 degrees Fahrenheit. The potatoes break their dormancy during this time and start greening. - Source: Internet
- Common Mistake: If you forget to fertilize or amend your potatoes with organic matter, you may only yield small, underdeveloped tubers. On the flip side, over-fertilizing can lead to an excess of foliage and greenery with very few actual potatoes. Many gardeners forget to follow package instructions or they grow potatoes in depleted soils that haven’t been amended with mineral-rich organic matter. - Source: Internet
- Most people don’t realize how chemical-laden potatoes are. When they are grown in industrial monocrops, a frightening volume of toxic chemicals, including carcinogens, pesticides like chlorpropham, and bee-harming sprays like imidacloprid. Yet another reason to grow your own spuds so you know exactly what’s going into them! - Source: Internet
- How to Avoid It: The best source for seed potato planting stock is a reputable garden store, nursery, or seed company. If you want to grow potatoes from grocery store spuds, be sure that you purchase USDA-certified organic potatoes. These have not been treated with chemical sprout inhibitors and will readily pre-sprout in your kitchen or greenhouse. - Source: Internet
- Place the seed potatoes with the sprouts facing up—or as many of them facing up as possible. Sometimes they sprout all wonky and there’s only so much you can do. The vine will find its way up eventually! - Source: Internet
- Common Mistake: Beginner gardeners sometimes get a bit overzealous with their watering habits, or they may plant potatoes and then ignore them altogether. Potato foliage can wilt from soil that is too dry, or it can look droopy from sitting in drenched mud. If you don’t stick your finger in the soil and check the moisture levels at least 6” down, you won’t know how much water your plants are really getting. - Source: Internet
- You will find everything you need to start growing potatoes in my PDF eBook, Grow a Good Life Guide to Growing Potatoes. Whether you are striving for a few gourmet fingerling potatoes or a large crop for winter food storage, this guide will show how you can grow your own, organic, homegrown potatoes. Click here to learn more. - Source: Internet
- Most potatoes benefit from hilling. Once the shoots reach about ten inches tall, scoop extra soil around the plants so it forms mounds. These mounds protect the plants and keep the tubers covered until they are ready for harvest. - Source: Internet
- How many times have you forgotten about that bag of potatoes in your pantry only to find them covered in strange, bumpy growth? These growths are buds or sprouts which grow from the potato eyes, and they look rather unappetizing. Some people toss the entire potato thinking it’s no good, while others cut the small buds off before cooking it. But did you know that you could actually plant these potatoes to grow more potatoes? - Source: Internet
- They have two kinds of stems. Firstly, potatoes have thick underground stems that produce the crop. Secondly, they have thin stems that are above ground that grow out leaves. - Source: Internet
- Those huge baked-potato-worthy spuds need a lot of nutrients to form. Potatoes are moderate to heavy feeding crops that need ample fertility to yield. Without enough nitrogen, phosphorus, potassium, and micronutrients, potatoes may look yellow, pale, small, or not grow at all. - Source: Internet
- One way to combat the disease issue is to let your seed potatoes cure for a few days after cutting and before planting. To cure them you simply need to let the cut potatoes sit in an airy, dry place that is out of the sun for 2 or 3 days. The cut side of the potato will dry and harden and get a leathery texture. This “hardens” up the cut side of the potato and helps keep soil born diseases out of the potato plant. - Source: Internet
- Add the potatoes to the pan and cook for 20 minutes or until tender. Sprinkle the cheddar cheese and bacon over the potatoes and mix everything until the cheese melts. Pour the potatoes into a large serving dish and sprinkle the fresh green onions over the top. - Source: Internet
- If you look at a seed potato you will see that each potato contains many “eye’s”. The small dimples you see on the surface of a potato are the eyes. As a seed potato gets ready to plant it will start to “chit” or sprout from those eyes. Those sprouts are what will eventually become the potato plant. And really each plant only needs 3 or 4 of those sprouts to establish and be productive. - Source: Internet
- After planting, potatoes will start flowering and forming tubers. Once the tubers are formed, your potatoes will need to be heavily watered to grow properly. If the foliage turns yellow and begins to die back, stop watering to prepare for harvest time. - Source: Internet
- Forgetting to check seed potatoes for “eyes” is the most common beginner gardener mistake. Potato eyes are the buds on the potato skin where sprouts emerge. You may have noticed them if you’ve ever had potatoes accidentally sprout in your pantry. The eyes look like dimples or little nubs, and they are arguably the most important part of the seed potato. - Source: Internet
 To get you started, here are some pointers to consider when searching for information regarding How To Plant Sprouted Potatoes In Containers:
- Do some research to find do you plant potatoes sprout up or down-related information from reputable sources. This may include professional journalists, as well as online libraries and other websites.
- When looking for information regarding How to Plant Potatoes, it is crucial to be aware of the various types of sources that can be found through electronic media. Some examples of these types of sites include Google and YouTube. There is also the possibility of obtaining information about Do You Plant Potatoes Sprout Up Or Down from various social media sites, such as Facebook and Twitter. This is another another potential source.
To get you started, here are some pointers to consider when searching for information regarding How To Plant Sprouted Potatoes In Containers:
- Do some research to find do you plant potatoes sprout up or down-related information from reputable sources. This may include professional journalists, as well as online libraries and other websites.
- When looking for information regarding How to Plant Potatoes, it is crucial to be aware of the various types of sources that can be found through electronic media. Some examples of these types of sites include Google and YouTube. There is also the possibility of obtaining information about Do You Plant Potatoes Sprout Up Or Down from various social media sites, such as Facebook and Twitter. This is another another potential source.Video | Do You Plant Potatoes Sprouts Up
Reading and doing research on the authenticity of each source are both essential if you want to discover the greatest information there is about Grow Your Own Potatoes – No Large Plot of Land Required!. Your understanding of How Deep Do You Plant Potatoes will be improved by watching the many videos on When To Plant Sprouted Potatoes that are included in this page. These films come from a variety of different sources. Finding knowledge on a wide range of subjects is made much simpler by making use of the internet as a resource.
## Here are some crucial points concerning How Deep Do You Plant Potatoes:- Do You Plant Potatoes Sprouts Up
- Do You Plant Potatoes Sprout Up Or Down
- Do You Plant Potatoes Sprout Side Up Or Down
- Which Way Do You Plant Potatoes Sprout Up Or Down
- Do You Plant Potatoes Sprout Up Or Down
You won’t have any trouble finding the information you’re looking for because there are so many websites and forums on the subject of do you plant potatoes sprout side up or down.
When it comes to obtaining information on How Deep Do You Plant Potatoes, the majority of individuals are more accustomed to using a different route. It enables a more in-depth look at the information regarding Do You Water Potatoes After Planting’s content and how it may be used, which is really helpful.

strategies to design information displays that are both aesthetically pleasing and functional that pertain to Frequently Asked Questions About Growing Potatoes. They are useful in commercial and marketing settings, and they can also be put to use to convey information on Can I Plant Sprouted Potatoes In Winter. As a result, we also supply some photos pertaining to How To Plant Sprouted Potatoes In Containers.
In summary, this article offers a comprehensive analysis of How Long Does It Take For Potatoes To Grow After Planting. In addition, Frequently Asked Questions About Growing Potatoes and How To Grow Potatoes from Eye To Harvest: It’s Simple and Fun! are mentioned here as a comparison of your knowledge regarding Planting Potatoes Sprouts Up Or Down.
